ZEUS ELISA SARS-CoV-2 Antibody Test Systems Assay Procedure
Follow ZEUS’s Universal ELISA Protocol |
|
|
Improved automation efficiency gained by integration into ZEUS’s menu through multi-batching on one plate. |
|
Share common components |
|
|
Same common kit components used in a run allow for easier multi-batching with industry’s broadest menu of ELISA products. Common components include SAVe Diluent®, Wash Buffer, TMB Substrate and Stop Solution. |
|
Flexible incubation times |
|
|
Validated assay incubation timing +/- 5 minutes pairs easier with automation and allows end-user flexibility. |
|
Fast protocols |
|
|
Potential total assay incubation time is less than 60 minutes. Maximize your lab’s workflow potential. |
|
Room Temperature Incubations |
|
|
Elevated temperature incubators are not required preventing potential automation scheduling conflicts. |
|
True Assay Controls |
|
|
Controls prepared and run identical to patient samples, at the same time, true assay controls ensure quality results. |
Assay Procedure:
- Remove the individual components from storage and allow them to warm to room temperature (20 – 25°C).
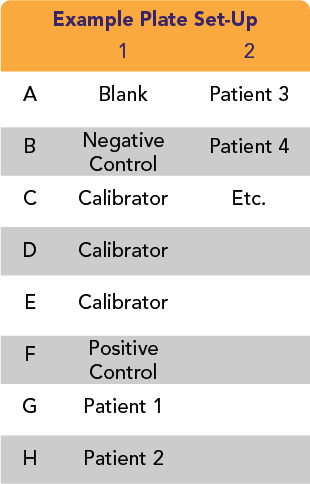
- Determine the number of microwells needed. Allow for six Control/Calibrator determinations (one Reagent Blank, one Negative Control, three Calibrators and one Positive Control) per run. Run a Reagent Blank on each assay. Check software and reader requirements for the correct Controls/Calibrator configurations. Return unused strips to the resealable pouch with desiccant, seal, and return to storage between 2 – 8°C.
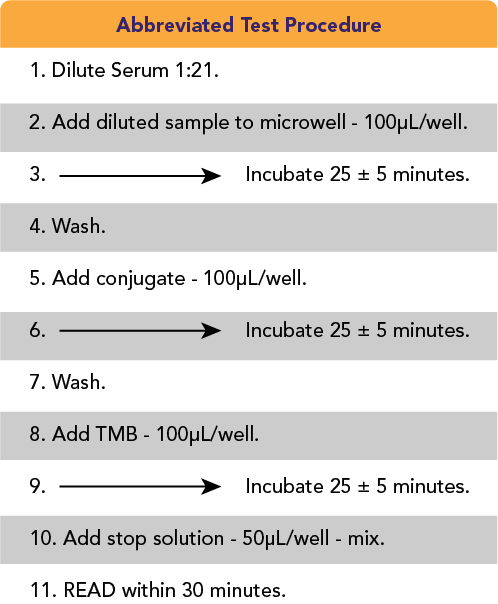
- For human serum or plasma samples, prepare a 1:21 dilution (e.g.: 10µL of serum + 200µL of SAVe Diluent) of the Negative Control, Calibrator, Positive Control, and each patient sample.
NOTE: The SAVe Diluent will undergo a color change confirming that the specimen has been combined with the diluent. - To individual wells, add 100mL of each diluted Control, Calibrator and 1:21 diluted patient specimen. Ensure that the samples are properly mixed. Use a different pipette tip for each sample.
- Add 100µL of SAVe Diluent to well A1 as a Reagent Blank. Check software and reader requirements for the correct Reagent Blank well configuration.
- Incubate the plate at room temperature (20 – 25°C) for 25 ± 5 minutes.
- Wash the microwell strips 5 times.
Manual Wash Procedure:- Vigorously shake out the liquid from the wells.
- Fill each microwell with Wash Buffer. Make sure no air bubbles are trapped in the wells.
- Repeat steps 1. and 2. for a total of 5 washes.
- Shake out the wash solution from all the wells. Invert the plate over a paper towel and tap firmly to remove any residual wash solution from the wells. Visually inspect the plate to ensure that no residual wash solution remains. Collect wash solution in a disposable basin and treat with disinfectant at the end of the day’s run.
Automated Wash Procedure:
If using an automated microwell wash system, set the dispensing volume to 300 – 350µL/well. Set the wash cycle for 5 washes with no delay between washes. If necessary, the microwell plate may be removed from the washer, inverted over a paper towel and tapped firmly to remove any residual wash solution from the microwells. - Add 100µL of the Conjugate to each well, including the Reagent Blank well, at the same rate and in the same order as the specimens.
- Incubate the plate at room temperature (20 – 25°C) for 25 ± 5 minutes.
- Wash the microwells by following the procedure as described in step 7.
- Add 100µL of TMB to each well, including the Reagent Blank well, at the same rate and in the same order as the specimens.
- Incubate the plate at room temperature (20 – 25°C) for 10 – 15 minutes.
- Stop the reaction by adding 50µL of Stop Solution to each well, including the Reagent Blank well, at the same rate and in the same order as the TMB. Positive samples will turn from blue to yellow. After adding the Stop Solution, tap the plate several times to ensure that the samples are thoroughly mixed.
- Set the microwell reader to read at a wavelength of 450nm and measure the optical density (OD) of each well against the Reagent Blank. Read the plate within 30 minutes of the addition of the Stop Solution.
- When using open, automated laboratory instrumentation, program the above assay steps according to the instrument manufacturer’s recommendations. Only instrument programs validated by the laboratory should be utilized.
Interpretation of Results:
- Calculations:
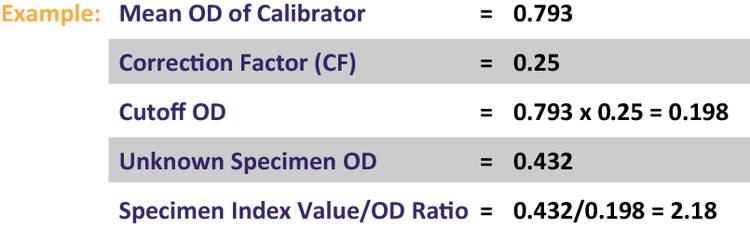
- Correction Factor: The manufacturer determined a Cutoff OD Value for positive samples and correlated it to the Calibrator. The Correction Factor (CF) allows for the determination of the Cutoff Value for positive samples. It will also correct for slight day-to-day variations in test results. The Correction Factor is determined for each lot of components and is printed on the Component Label located in the Test System box.
- Calculate the mean of the three Calibrator wells. If any of the three values differ by more than 15% from the mean, discard that value and calculate the mean using the remaining two wells.
- Cutoff OD Value: To obtain the Cutoff OD Value, multiply the CF by the mean OD of the Calibrator determined above.
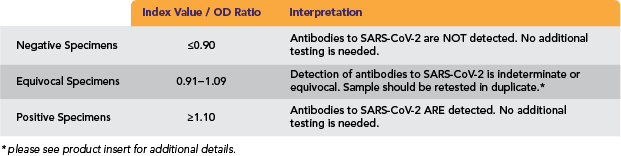
(CF x Mean OD of Calibrator = Cutoff OD Value) - Index Values / OD Ratios: Calculate the Index Value/OD Ratio for each specimen by dividing its OD Value by the Cutoff OD from step c.
- Interpretations: Index Values/OD Ratios are interpreted as follows: